Home Plate Replacement and Reconstruction
Recommended Equipment
|
|
|

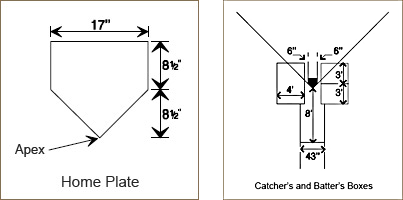
The home plate area experiences very high traffic. An improperly maintained home plate area results in bad ball hops and injuries. Because of the abuse caused by such high traffic, this area must be properly prepared. If home plate is worn, now may be the best time to replace it. The home plate area is a circle with a 26-foot diameter. The batter's box and catcher’s box should be completely level with home plate. Turface® Mound Clay® and MoundMaster® Blocks should be used in the batter's box and catche's box.
Recommended Equipment and Materials
|
|
The following steps are similar to those in replacing the pitching rubber.
- To start, take a long nail and place it in the ground at the apex of home plate. This will act as a reference guide when dropping the new plate into the existing foundation.
HINT: It is a good idea to stretch string from the 1st base and 3rd base lines past home plate. The two strings will intersect at the apex where you have placed your nail. If the walls collapse and the nail falls, you will have a back up mark where the strings cross. - With a pick dig out in front of the plate, exposing the entire front base of the plate.
- Dig out one side of the plate in a similar manner.
- A person should support the back edges by standing with their feet apart at the apex of home plate (see diagram below); slowly and carefully pry out the plate from the front. This should leave three supporting walls in tact. Remove feet so you don’t collapse walls.

- Once the plate is removed, eliminate any excess material in or surrounding the hole.
- Take some packing clay and spread and level it in the base of the foundation.
- Place new home plate into existing foundation.
- For proper accuracy, use a carpenter’s level and tamp to level the plate from front to back and side to side.
- Once the plate is leveled, fill all voids surrounding the plate with prepared packing clay.
- Lightly tamp the new material so it will firm up and bond with the existing soil.
- Make sure the batter's box and the catcher's box are built up to where they are perfectly level with the top of the plate. If home plate is elevated, even by the slightest amount, it can be a safety hazard. Leveling can be accomplished by adding clay, smoothing with the ten foot 2" x 4" placed on top of home plate and then lightly tamping.
ONLY THE WHITE LEVEL PORTION OF THE PLATE SHOULD BE VISIBLE. THE BLACK SLOPING SIDES SHOULD BE COVERED WITH DIRT.
HINT: Many times a home plate is anchored with a cement anchor or a wooden base. This provides added security from home plate movement and makes replacement easier. Consult a base company for ways to accomplish this.